When planting elephant ear bulbs, it’s important to know the optimal depth to ensure optimal growth. According to the sources, the bulbs should be planted around 1 to 2 inches deep in the soil. This depth allows the bulbs to establish themselves properly while still being able to receive enough moisture and nutrients from the soil. Planting the bulbs too shallow or too deep can hinder their growth and potentially lead to issues such as rotting or inadequate access to nutrients. By following the recommended planting depth, you can set your elephant ear bulbs up for successful growth.
Key Takeaways:
- Plant elephant ear bulbs 1 to 2 inches deep in the soil for optimal growth.
- Proper planting depth allows bulbs to establish and receive adequate moisture and nutrients.
- Avoid planting bulbs too shallow or too deep to prevent growth issues.
- Following the recommended planting depth promotes successful growth of elephant ear bulbs.
- Set your bulbs up for success by planting them at the optimal depth.
When to Plant Elephant Ear Bulbs
Planting elephant ear bulbs at the right time is crucial for their successful growth. It is recommended to plant them in the spring, after the danger of frost has passed. Waiting for the soil to warm up is essential, as elephant ear bulbs require a soil temperature of at least 65ºF to start growing. Planting too early, when the soil is still cold, can lead to bulb rot and hinder their growth.
In cooler zones, where elephant ears are treated as annuals, it is best to wait until the soil has warmed up before planting. This ensures that the bulbs have the optimal conditions to thrive and develop into healthy plants. By following the appropriate timing, you can give your elephant ear bulbs the best chance for success.
If you are unsure about the timing in your specific region, you can consult local gardening resources or contact a horticulture expert for guidance.
Table: Ideal Planting Time for Elephant Ear Bulbs in Different Zones
| Hardiness Zone | Ideal Planting Time |
|---|---|
| Zones 8-11 | Spring |
| Zones 4-7 | After Last Frost Date in Spring |
Note: These are general guidelines. It’s always recommended to consider specific local conditions and consult gardening references for precise planting times in your area.
Where to Plant Elephant Ear Bulbs
When choosing a location to plant your elephant ear bulbs, it’s important to consider their preferences for sun exposure and soil conditions. Elephant ears thrive in a partially shaded location, although some varieties can tolerate full sun. Too much direct sunlight can cause the leaves to scorch, while too much shade can result in leggy plants.
In terms of soil, elephant ears prefer rich, well-draining soil. They thrive in soil that is rich in organic matter, but they can tolerate a wide range of soil types as long as they have adequate water and good drainage. Before planting, you can improve the soil quality by adding compost or loamy topsoil to the planting area.
Whether you choose to plant your elephant ear bulbs in a garden bed or containers, make sure the location provides the right balance of light and shade, as well as nutrient-rich, well-draining soil. This will give your plants the best chance to grow and thrive.
Key Points:
- Elephant ear bulbs should be planted in a partially shaded location.
- Most varieties prefer filtered sunlight or partial shade.
- Some varieties can tolerate full sun but may require extra care.
- Choose a location with rich, well-draining soil.
- Elephant ears thrive in soil rich in organic matter.
- Adding compost or loamy topsoil can improve soil quality.
How to Plant Elephant Ear Bulbs
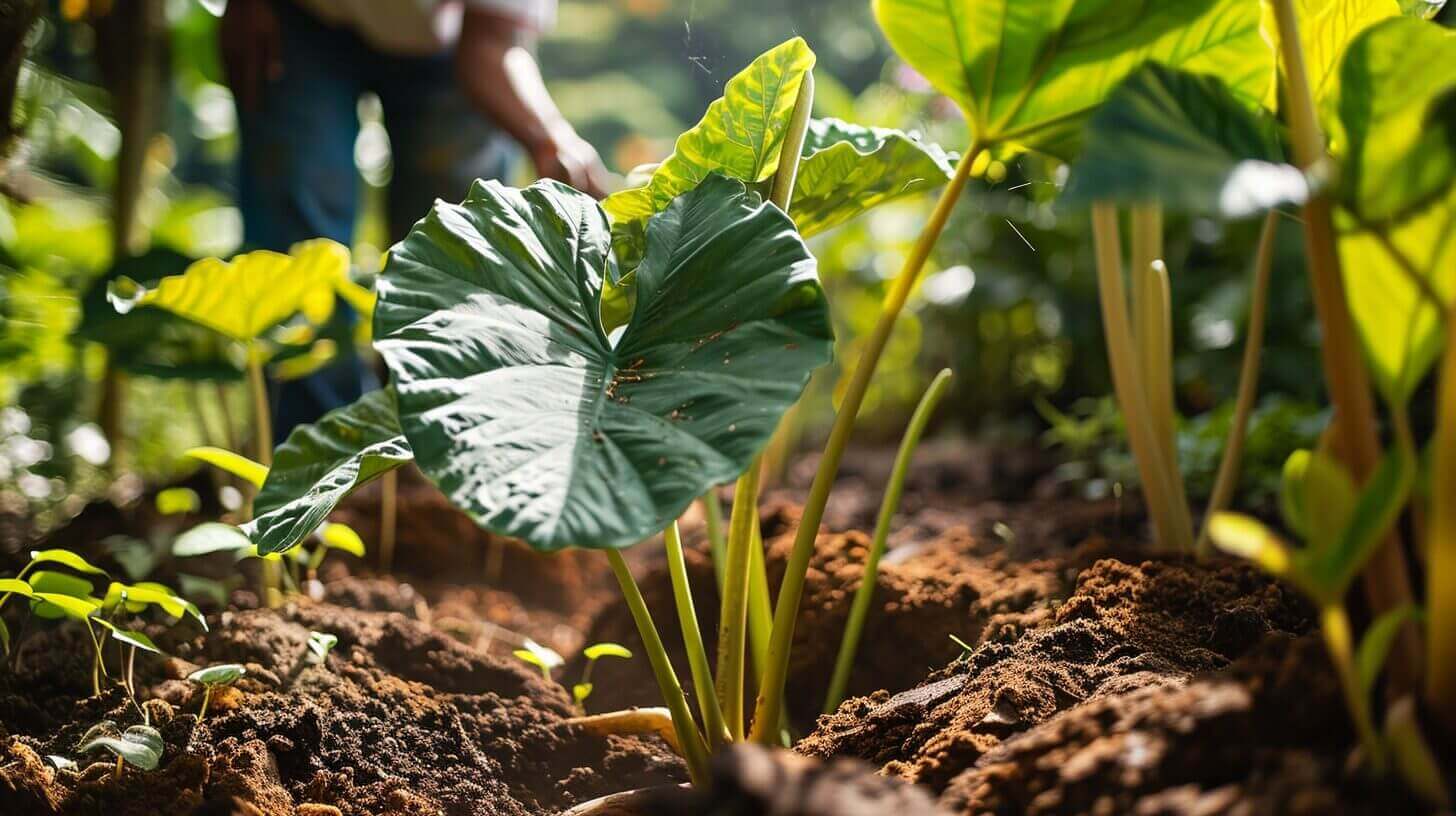
Planting elephant ear bulbs is a straightforward process that can be easily followed to ensure successful growth. Here’s a step-by-step guide on how to properly plant elephant ear bulbs:
- Dig a hole that is about three to four times the size of the bulb. This will provide enough space for the roots to spread and establish themselves.
- Refill the hole with loose soil, leaving the top of the bulb about 1 to 2 inches below ground level. This depth allows the bulb to receive adequate moisture and nutrients from the soil.
- Place the bulb in the hole with the pointed side facing up and the root disc facing down. This orientation ensures that the bulb will grow in the right direction.
- Cover the bulb with soil, gently patting it down to secure it in place. Avoid compacting the soil too much, as it may hinder the bulb’s growth.
- Water the area deeply after planting to settle the soil and provide moisture to the bulb. Adequate watering is essential for the bulb’s initial growth and establishment.
By following these steps, you can ensure that the elephant ear bulbs are planted correctly and have the best conditions for germination and growth. It’s important to note that the bulbs may take several weeks to emerge from the soil, so be patient and continue providing proper care throughout the growing season.
Planting elephant ear bulbs in the right way is key to their successful growth. Here’s a summarized version of how to plant elephant ear bulbs:
- Dig a hole three to four times the size of the bulb.
- Refill the hole with loose soil, leaving the top of the bulb 1 to 2 inches below ground level.
- Place the bulb in the hole with the pointed side facing up and the root disc facing down.
- Cover the bulb with soil and water the area deeply.
Following these steps will ensure that the bulbs have the right conditions to sprout and grow successfully.
How to Care for Elephant Ear Bulbs
Proper care is essential for the successful growth of elephant ear bulbs. Here are some key guidelines to ensure their well-being:
1. Provide Consistent Moisture
Elephant ear bulbs thrive in moist soil, so it’s important to provide them with consistent moisture. Regular watering is necessary to prevent the soil from drying out. Keep an eye on the moisture level of the soil and water the plants whenever it feels dry to the touch. Droopy leaves can be an indication that the plant needs to be watered. Aim to keep the soil evenly moist, but avoid overwatering, as this can lead to root rot.
2. Apply Liquid Fertilizer
Regular applications of liquid fertilizer can help support the growth of elephant ear bulbs. Apply a balanced, water-soluble fertilizer approximately every two to three weeks during the growing season. This will provide the plants with the necessary nutrients to thrive. Follow the instructions on the fertilizer packaging for proper dilution and application. Avoid over-fertilizing, as this can lead to excessive foliage growth at the expense of bulb development.
3. Protect from Freezing Temperatures
In regions with cold winters, it’s important to protect elephant ear bulbs from freezing temperatures. Freezing can damage or kill the bulbs, preventing them from regrowing in the following season. There are two main approaches to protecting the bulbs:
- Grow as Annuals: Treat elephant ears as annual plants and discard the bulbs after the growing season. This is a suitable option for gardeners who prefer not to go through the process of storing and replanting the bulbs.
- Dig up and Store: Before temperatures drop below 40ºF, dig up the bulbs and store them in a cool, dark place for the winter. Choose a location with proper ventilation to prevent rotting. You can store the bulbs in a paper bag with holes or an open crate filled with peat moss or garden vermiculite. Ensure that the bulbs are not damaged during storage to maximize their chances of regrowth in the next growing season.
By providing consistent moisture, applying liquid fertilizer, and protecting the bulbs from freezing temperatures, you can ensure the health and vitality of your elephant ear bulbs.
| Key Care Guidelines for Elephant Ear Bulbs |
|---|
| Provide consistent moisture |
| Apply liquid fertilizer every 2-3 weeks |
| Protect from freezing temperatures |
Dividing and Transplanting Elephant Ear Bulbs
When it comes to propagating more elephant ear plants, dividing and transplanting the bulbs is a straightforward process. One of the ways elephant ear plants reproduce is through offsets, which are smaller bulbs that form around the main bulb. Dividing running varieties involves digging up a section of the plant and replanting it elsewhere.
It’s important to take precautions when dividing elephant ear bulbs, as they contain a natural chemical compound that can cause skin irritation in some people. To protect yourself, it’s recommended to wear gloves and long sleeves during the process. By doing so, you can avoid any potential discomfort or allergic reactions.
The division and transplanting of elephant ear bulbs provide an opportunity to expand your garden and create more beautiful plants. Whether you want to fill in empty spaces or share the joy of gardening with friends and family, this method allows you to generate new growth from existing bulbs.
| Benefits of Dividing Elephant Ear Bulbs |
|---|
| Creates more plants for your garden |
| Allows you to fill in empty spaces |
| Provides an opportunity to share plants with others |
| Strengthens the overall health of the plants |
By following the proper techniques for dividing and transplanting elephant ear bulbs, you can enjoy the rewards of a thriving garden and a bountiful display of these stunning plants. Remember to handle the bulbs with care, wear protective gear, and choose appropriate planting locations to ensure successful growth and an impressive garden.
Storing Elephant Ear Bulbs for Winter
When the growing season comes to an end, it’s time to store your elephant ear bulbs for the winter. Proper storage is essential to ensure the bulbs remain healthy and ready for replanting in the next growing season.
The first step in storing elephant ear bulbs is to dig them up carefully. Gently remove the soil around the bulbs, being careful not to damage them. Once they are out of the ground, shake off any excess soil, but do not wash them.
Next, find a cool and dry place to store the bulbs. It’s crucial to choose a location with proper ventilation to prevent the bulbs from rotting. You can store the bulbs in a paper bag with holes for ventilation or an open crate filled with peat moss or garden vermiculite.
During the winter months, the bulbs will enter a dormant period. They are not actively growing, but they are still alive. By providing them with the right storage conditions, you will ensure their survival through the winter, ready to be replanted when the warmer weather returns.
FAQ
How deep should I plant elephant ear bulbs for optimal growth?
The bulbs should be planted around 1 to 2 inches deep in the soil.
When is the best time to plant elephant ear bulbs?
Elephant ear bulbs should be planted in the spring, after any danger of frost has passed.
Where should I plant elephant ear bulbs?
Elephant ear bulbs should be planted in a partially shaded location with rich, well-draining soil.
How do I plant elephant ear bulbs?
Dig a hole three to four times the size of the bulb, plant the bulb 1 to 2 inches below ground level with the pointed side up, cover with soil, and water deeply.
How do I care for elephant ear bulbs?
Provide consistent moisture through regular watering, apply liquid fertilizer every two to three weeks, and protect from freezing temperatures in colder regions.
How do I divide and transplant elephant ear bulbs?
Dig up a section of the plant and replant it elsewhere, wearing gloves and long sleeves as the plants can cause skin irritation.
How do I store elephant ear bulbs for winter?
Store the bulbs in a cool, dry place with proper ventilation during their dormant period.